


The Users module is where you create and manage the users of the platform. It is the first module in the main menu and the one you will use most often.
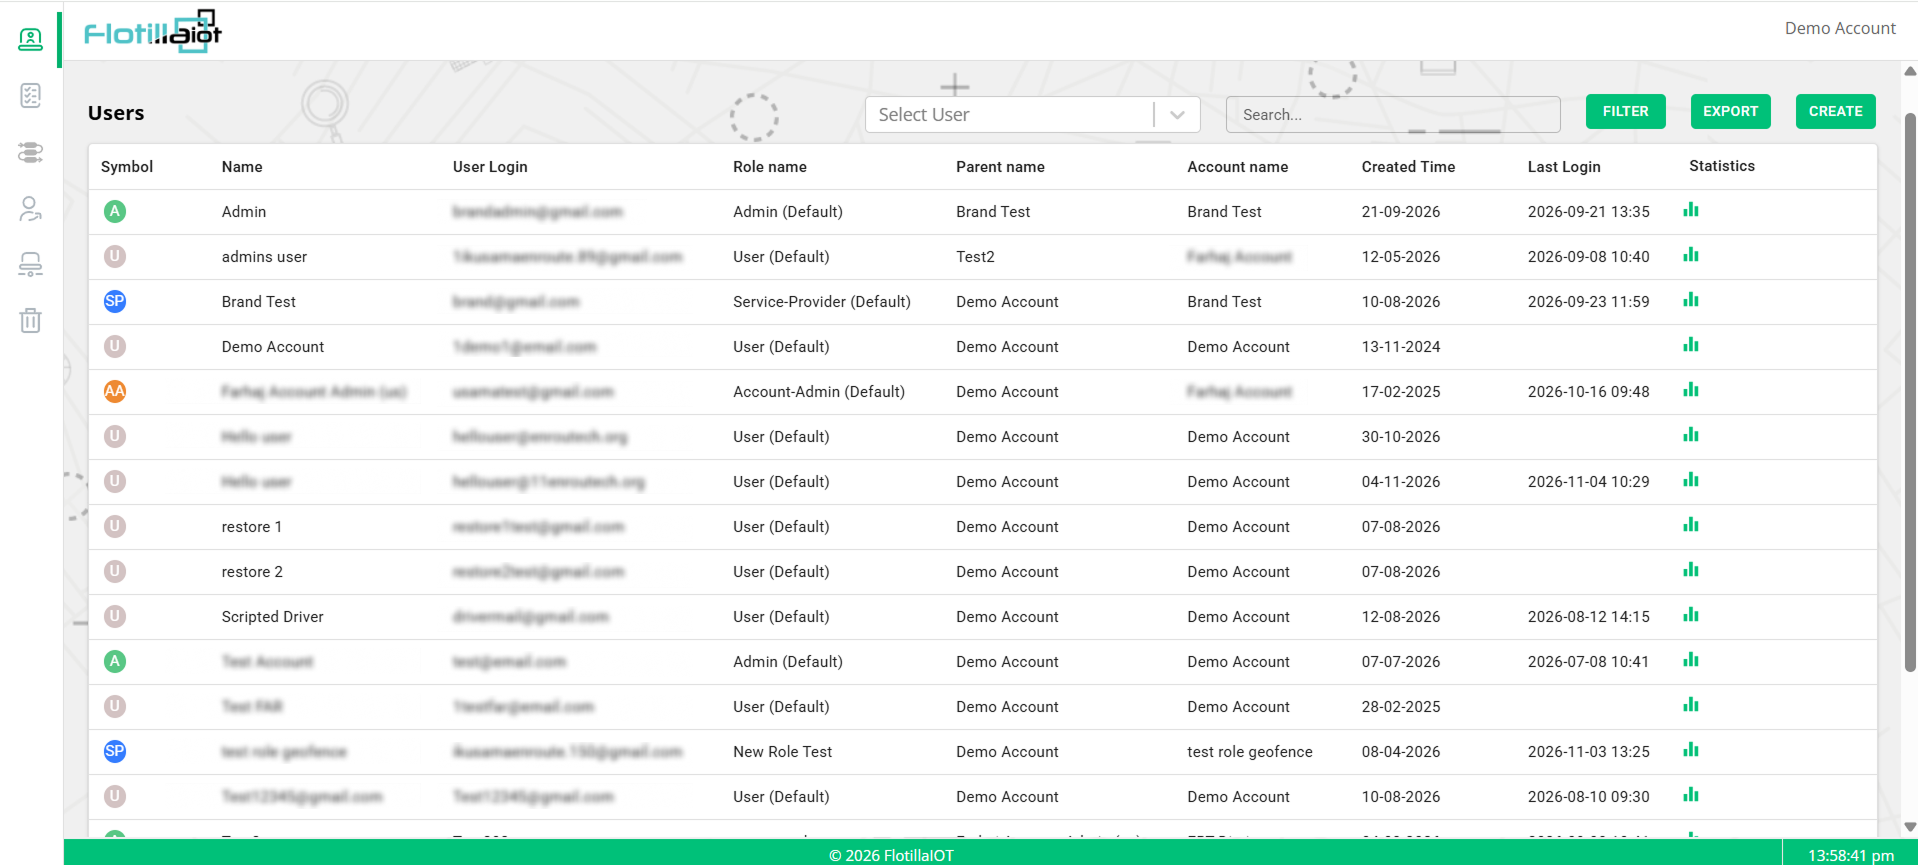
- The list shows each user’s symbol, name, login, role, parent, account, creation time, last login and statistics.
- The toolbar lets you pick a user, search, filter, export the list and create new users (Figure 1.1).
- The Login as User control lets you open the platform as another user (section 2.5).
2.1 Reading the User List
| Column | What it shows |
|---|---|
| Symbol | A round marker that shows the type of user (section 2.2). |
| Name | The display name of the user. |
| User Login | The login of the user, usually an email address. |
| Role name | The role assigned to the user, for example Admin (Default), User (Default) or a custom role. The role decides what the user can see and do (Chapter 5). |
| Parent name | The parent account or user above this one. |
| Account name | The account the user belongs to. |
| Created Time | The date on which the user was created. |
| Last Login | The date and time of the last sign-in. An empty cell means that no sign-in is recorded for the user. |
| Statistics | The bar-chart icon at the end of the row opens the statistics of that user. |
NOTE Depending on your account level, the list can show extra columns, such as Account Ref No, and a Login as User control at the end of each row (section 2.5).
2.2 User Symbols
The round symbol at the start of each row tells you the type of user at a glance:
| Symbol | Type of user | Typical role |
|---|---|---|
| U (grey) | User | User (Default) |
| A (green) | Admin | Admin (Default) |
| AA (orange) | Account admin | Account-Admin (Default) |
| SP (blue) | Service provider | Service-Provider (Default) |
2.3 Toolbar Controls
| Control | What it does |
|---|---|
| Select User | A drop-down to pick one user and show only that user in the list. |
| Search | Type part of a name, login, role or account to narrow the list. |
| FILTER | Opens filter options to limit the list to the records you need. |
| EXPORT | Exports the list so that you can use it outside the platform, for example in a spreadsheet. |
| CREATE | Opens the form to create a new user. |
2.4 Creating a User
- Click CREATE at the top right of the Users list.
- Enter the name, the user login (an email address) and a password.
- Choose the Role name that matches what the user should be allowed to do.
- Select the parent and the account the user belongs to.
- Save the user. The new user now appears in the list, with an empty Last Login until the first sign-in.
TIP Use Search to check that a login does not already exist before you create a new user.
2.5 Signing in as Another User
The Login as User control at the end of each row lets you open the platform as the selected user. It saves you from asking the customer for their password, and it shows you exactly what they see.
- Find the user with Search, Select User or FILTER.
- Use the drop-down at the end of the row if you need to choose an option for the sign-in.
- Click the sign-in icon beside the drop-down. The platform opens in the context of that user.
- When you are done, click Switch back in the blue banner to return to your own account.
IMPORTANT While you are signed in as another user, everything you do is done in that user’s account. Only change data when it is necessary, and review the result in Action Logs (Chapter 4).
2.6 Managing Existing Users
- Find a user with Search, Select User or FILTER.
- Check activity in the Last Login column, and open Statistics for more detail.
- Change a role by opening the user and selecting a different role. The new permissions apply to everything the user does next.
- Check the account in the Parent name and Account name columns.
- Remove users you no longer need. Deleted records go to Trash (Chapter 7).